CentOS 7.8 编译安装LNMP

目录
  1. CentOS 7.8 编译安装LNMP
    1. 查看CentOS版本信息
    2. yum安装必要包
    3. Mysql安装
      1. 1. 通过yum安装
      2. 2. 初始化密码
      3. 3. 忘记密码
  2. PHP 7.3安装
    1. 1. 下载安装包并解压
    2. 2. 进入安装包编译
    3. 3. php配置
    4. 4. php环境变量
    5. 5. php-fpm配置
    6. 6. 安装redis服务
    7. 7. 安装redis扩展
    8. 8. 安装swoole扩展
  • Nginx安装
    1. 1. openresty安装
    2. 2. nginx配置
    3. 3. 启动nginx
    4. 4. 测试
  • CentOS 7.8 编译安装LNMP

    查看CentOS版本信息

    1
    2
    [root@test1 ~]# cat /etc/redhat-release 
    CentOS Linux release 7.8.2003 (Core)

    yum安装必要包

    1
    2
    3
    yum -y install gcc gcc-c++
    yum -y install libxml2-devel
    yum -y install openssl-devel libjpeg-devel libpng-devel libXpm-devel ImageMagick ImageMagick-devel freetype freetype-devel curl-devel m4 zip unzip libxslt-devel*

    Mysql安装

    1. 通过yum安装
    1
    2
    3
    wget https://repo.mysql.com/mysql-community-release-el7-5.noarch.rpm
    rpm -ivh mysql-community-release-el7-5.noarch.rpm
    yum -y install mysql-server
    2. 初始化密码
    1
    2
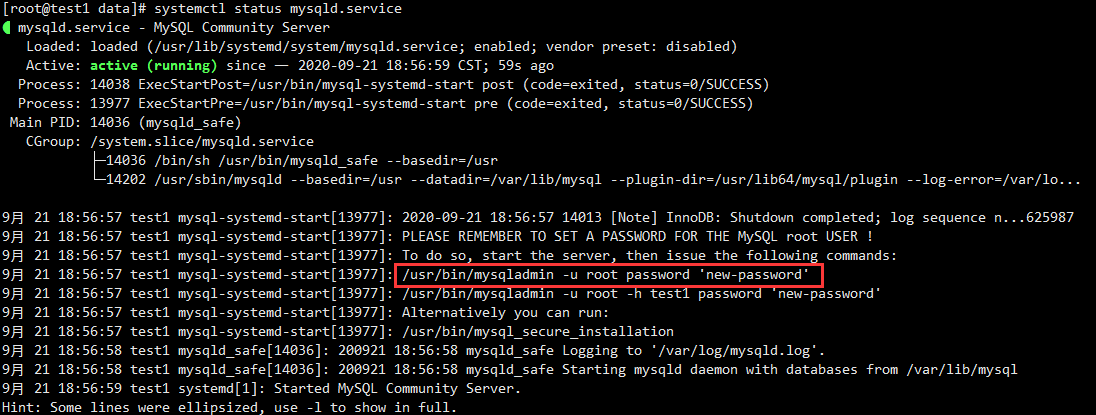
    systemctl start mysqld.service
    systemctl status mysqld.service // mysql状态如下,红色标记为设置root密码

    1
    2
    3
    4
    5
    6
    7
    8
    9
    10
    11
    12
    13
    14
    15
    16
    mysql -u root -p   // 输入自己设置的密码
    [root@test1 ~]# mysql -u root -p
    Enter password:
    Welcome to the MySQL monitor. Commands end with ; or \g.
    Your MySQL connection id is 925
    Server version: 5.6.49 MySQL Community Server (GPL)

    Copyright (c) 2000, 2020, Oracle and/or its affiliates. All rights reserved.

    Oracle is a registered trademark of Oracle Corporation and/or its
    affiliates. Other names may be trademarks of their respective
    owners.

    Type 'help;' or '\h' for help. Type '\c' to clear the current input statement.

    mysql>

    mysql安装目录在/var/lib/mysql

    3. 忘记密码
    1
    vim /etc/my.cnf

    在[mysqld]后添加skip-grant-tables

    例如:

    1
    2
    3
    4
    [mysqld]
    datadir=/var/lib/mysql
    socket=/var/lib/mysql/mysql.sock
    skip-grant-tables

    重启

    1
    2
    3
    4
    systemctl restart mysqld.service
    mysql -u root -p
    mysql> use user;
    mysql> UPDATE user SET Password = password ( 'new-password' ) WHERE User = 'root';

    再修改my.cnf文件,去掉skip-grant-tables,重启mysql就好啦!

    PHP 7.3安装

    1. 下载安装包并解压

    创建data目录,并进入data目录下

    1
    2
    [root@test1 ~]# mkdir /data
    [root@test1 ~]# cd /data/

    下载php安装包

    1
    [root@test1 ~]# wget https://www.php.net/distributions/php-7.3.23.tar.gz

    解压:

    1
    tar zxvf php-7.3.22.tar.gz
    2. 进入安装包编译
    1
    2
    3
    4
    cd php-7.3.22
    ./configure --prefix=/usr/local/php --with-curl --with-freetype --enable-gd --with-jpeg --with-gettext --with-iconv --with-kerberos --with-libdir=lib64 --with-libxml --with-mysqli --with-openssl --with-pdo-mysql --with-pdo-sqlite --with-pear --enable-sockets --with-mhash --with-ldap-sasl --with-xmlrpc --with-xsl --with-zlib --enable-fpm --enable-bcmath --enable-inline-optimization --enable-mbregex --enable-mbstring --enable-opcache --enable-pcntl --enable-shmop --enable-soap --enable-sockets --enable-sysvsem --enable-xml --with-zip --with-config-file-path=/usr/local/php/etc -with-bz2 --enable-sysvsem
    // 成功后
    make && make install

    编译安装PHP 7.4提示No package ‘libzip’ found或者(libzip >= 0.11),原因是libzip没有安装或者版本太低,解决方法如下:

    1
    2
    3
    4
    5
    6
    7
    8
    #卸载老版本的libzip
    yum remove libzip
    #下载安装libzip-1.2.0
    wget https://libzip.org/download/libzip-1.2.0.tar.gz
    tar -zxvf libzip-1.2.0.tar.gz
    cd libzip-1.2.0
    ./configure
    make && make install

    安装完成后,查看是否存在/usr/local/lib/pkgconfig目录,如果存在,执行如下命令来设置PKG_CONFIG_PATH:

    1
    export PKG_CONFIG_PATH="/usr/local/lib/pkgconfig/"

    如果还是安装失败

    修改 Makefile

    EXTRA_LIBS = -lcrypt -lz ……

    最后面添加-liconv

    configure报错error: off_t undefined; check your library configuration

    1
    2
    3
    4
    5
    6
    7
    8
    9
    vim /etc/ld.so.conf 
    #添加如下几行
    /usr/local/lib64
    /usr/local/lib
    /usr/lib
    /usr/lib64
    :x #保存退出

    ldconfig -v #使之生效

    configure报错,致命错误:zipconf.h:没有那个文件或目录

    1
    cp /usr/local/lib/libzip/include/zipconf.h /usr/local/include/zipconf.h
    3. php配置

    拷贝php.ini配置文件

    1
    2
    3
    // 还是在/data/php-7.3.22 目录下
    cp php.ini-production /usr/local/php/etc/php.ini
    php -i | grep php.ini // 可以用这个命令查看php使用的ini的位置

    编辑php.ini

    1
    2
    3
    short_open_tag=On
    date.timezone=Asia/Shanghai
    display_errors=On // 测试环境用,正式环境关闭
    4. php环境变量
    1
    vim ~/.bash_profile

    再重新加载

    1
    2
    3
    4
    5
    [root@test1 ~]# source ~/.bash_profile 
    [root@test1 ~]# php -v
    PHP 7.3.22 (cli) (built: Sep 25 2020 17:54:53) ( NTS )
    Copyright (c) 1997-2018 The PHP Group
    Zend Engine v3.3.22, Copyright (c) 1998-2018 Zend Technologies

    配置成功

    5. php-fpm配置
    1
    cp /usr/local/php/etc/php-fpm.conf.default /usr/local/php/etc/php-fpm.conf

    进入到cd /usr/local/php/etc/ 目录下

    编辑 php-fpm.conf

    1
    error_log = log/php-fpm.log

    打开记录日志

    进入到cd php-fpm.d

    1
    cp www.conf.default www.conf

    编辑www.conf

    1
    2
    user = nobody
    group = nobody

    设置开机启动

    1
    2
    3
    4
    cp sapi/fpm/init.d.php-fpm /etc/init.d/php-fpm #因为php5.3开始自带fpm,使用自带的管理脚本
    chmod +x /etc/init.d/php-fpm
    chkconfig php-fpm on #设置开机自启动
    /etc/init.d/php-fpm start #启动php-fpm
    6. 安装redis服务

    首先安装redis

    1
    2
    3
    4
    5
    6
    7
    yum -y install tcl
    wget http://download.redis.io/releases/redis-4.0.9.tar.gz
    tar zxvf redis-4.0.9.tar.gz
    cd redis-4.0.9
    make
    make test
    make install

    修改redis.conf配置

    1
    2
    3
    4
    5
    6
    7
    8
    vim /data/redis-4.0.9/redis.conf
    daemonize no
    // 改成
    daemonize yes

    requirepass foobared
    // 去掉注释,改成自己的密码
    requirepass 123456

    配置redis服务管理脚本

    1
    2
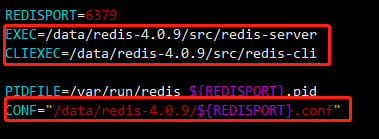
    cp /data/redis-4.0.9/utils/redis_init_script /etc/init.d/redis
    vim /etc/init.d/redis

    路径配置一下,注意:是6379.conf

    1
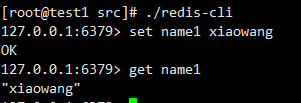
    /etc/init.d/redis start

    测试是否开启成功

    1
    [root@test1 ~]# redis-cli -a "123456"

    7. 安装redis扩展
    1
    2
    3
    4
    5
    6
    7
    8
    9
    yum -y install autoconf
    wget https://pecl.php.net/get/redis-5.3.1.tgz
    tar zxvf redis-5.3.1.tgz
    cd redis-5.3.1
    /usr/local/php/bin/phpize
    ./configure --with-php-config=/usr/local/php/bin/php-config
    make
    make test
    make install

    提示这个,安装成功

    编辑php.ini文件

    1
    extension=redis.so

    重启php-fpm

    1
    2
    3
    [root@test1 ~]# /etc/init.d/php-fpm restart
    [root@test1 ~]# php -m | grep redis
    redis

    测试

    1
    2
    3
    4
    5
    6
    // 连接本地的 Redis 服务
    $redis = new Redis();
    $redis->connect('127.0.0.1', 6379);
    $redis->auth('111111');
    // 查看服务是否运行
    echo "Server is running: " . $redis->ping()."\n";
    1
    2
    [root@test1 data]# php redistest.php 
    Server is running: 1
    8. 安装swoole扩展
    1
    2
    3
    4
    5
    6
    7
    wget https://pecl.php.net/get/swoole-4.5.4.tgz
    tar zxvf swoole-4.5.4.tgz
    cd swoole-4.5.4
    /usr/local/php/bin/phpize
    ./configure --with-php-config=/usr/local/php/bin/php-config
    make
    make install

    编辑php.ini文件

    1
    extension=swoole.so

    重启php-fpm

    1
    2
    3
    [root@test1 ~]# /etc/init.d/php-fpm restart
    [root@test1 ~]# php -m | grep swoole
    swoole

    Nginx安装

    1. openresty安装
    1
    2
    3
    4
    5
    6
    wget https://openresty.org/download/openresty-1.17.8.2.tar.gz
    tar zxvf openresty-1.17.8.2.tar.gz
    cd openresty-1.17.8.2
    ./configure
    gmake
    gmake install

    openresty默认安装/usr/local

    2. nginx配置

    进入/usr/local/openresty/nginx/conf

    编辑nginx.conf

    1
    2
    3
    4
    // 在http里添加
    http{
    include vhosts/*.conf;
    }

    创建vhosts目录

    编辑vhosts/test.conf

    1
    2
    3
    4
    5
    6
    7
    8
    9
    10
    11
    12
    13
    14
    15
    16
    17
    18
    19
    20
    21
    22
    23
    24
    25
    26
    27
    28
    29
    30
    31
    32
    33
    34
    35
    36
    37
    server {
    listen 80;
    server_name 192.168.0.105;
    index index.php index.html index.htm;
    root html;

    # redirect server error pages to the static page /50x.html
    error_page 500 502 503 504 /50x.html;
    location = /50x.html {
    root html;
    }

    location ~ .*\.(gif|jpg|jpeg|png|bmp|swf)$
    {
    expires 30d;
    }

    location ~ .*\.(js|css)?$
    {
    expires 24h;
    }

    if ($request_filename !~* (\.xml|\.rar|\.html|\.htm|\.php|\.swf|\.css|\.js|\.gif|\.png|\.jpg|\.jpeg|robots\.txt|index\.php|\.jnlp|\.jar|\.eot|\.woff|\.ttf|\.svg)) {
    rewrite ^/(.*)$ /index.php/$1 last;
    }

    location ~ .*\.php {
    fastcgi_pass 127.0.0.1:9000;
    fastcgi_index index.php;
    fastcgi_split_path_info ^(.+\.php)(.*)$;
    fastcgi_param SCRIPT_FILENAME $document_root$fastcgi_script_name;
    fastcgi_param PATH_INFO $fastcgi_path_info;
    fastcgi_param PATH_TRANSLATED $document_root$fastcgi_path_info;
    include fastcgi_params;
    }
    }

    3. 启动nginx
    1
    2
    3
    /usr/local/openresty/nginx/sbin/nginx
    /usr/local/openresty/nginx/sbin/nginx -s reload
    /usr/local/openresty/nginx/sbin/nginx -s stop
    4. 测试

    进入/usr/local/openresty/nginx/html目录

    编辑index.php

    1
    2

    phpinfo();

    在浏览器打开

    http://192.168.0.105/index.php