CentOS 7.8 安装ElasticSearch
官方下载地址:https://www.elastic.co/downloads/elasticsearch
下载rpm包 https://artifacts.elastic.co/downloads/elasticsearch/elasticsearch-7.9.2-x86_64.rpm
yum安装必要包
rpm包安装
1
| rpm -ivh elasticsearch-7.9.2-x86_64.rpm
|
就这一条命令就可以安装好es和java,并且自动就配置好了环境。
设置环境变量
1
2
3
4
| vim ~/.bash_profile
在PATH后面继续添加:/usr/share/elasticsearch/jdk/bin:/usr/share/elasticsearch/bin
# 查看java版本
java -version
|
设置开机启动
1
| systemctl enable elasticsearch
|
启动
1
| systemctl start elasticsearch
|
关闭
1
| systemctl stop elasticsearch
|
查看状态
1
| systemctl status elasticsearch
|
安装中文分词插件
1
2
3
4
5
| elasticsearch-plugin install https://github.com/medcl/elasticsearch-analysis-ik/releases/download/v7.9.2/elasticsearch-analysis-ik-7.9.2.zip
#拼音插件
elasticsearch-plugin install https://github.com/medcl/elasticsearch-analysis-pinyin/releases/download/v7.9.2/elasticsearch-analysis-pinyin-7.9.2.zip
|
设置外网访问
1
2
3
4
5
6
| vim /etc/elasticsearch/elasticsearch.yml
bootstrap.memory_lock: true
network.host: 0.0.0.0 #外网访问
http.port: 9200
discovery.seed_hosts: ["192.168.0.101", "192.168.0.102", "192.168.0.105"]
|
查看日志
1
| tail -f /var/log/elasticsearch/elasticsearch.log
|
会报一个内存分配的错误
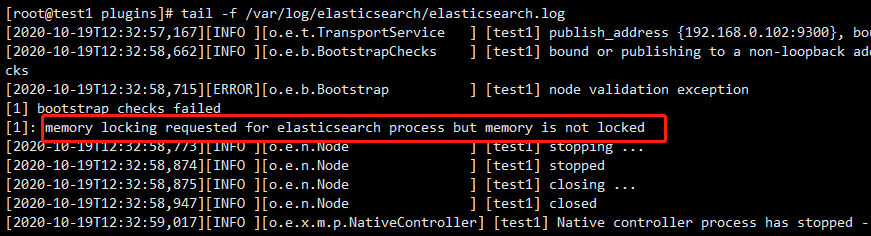
参考:https://www.elastic.co/guide/en/elasticsearch/reference/7.9/setting-system-settings.html
改不好的话可以 bootstrap.memory_lock: false
PHP中使用Elasticsearch
composer.json
1
2
3
4
5
| {
"require": {
"elasticsearch/elasticsearch": "^7.9"
}
}
|
创建索引index.php
1
2
3
4
5
6
7
8
9
10
11
12
13
14
15
16
17
18
19
20
21
22
23
24
25
26
27
28
29
30
31
32
33
34
| <?php
require 'vendor/autoload.php';
use Elasticsearch\ClientBuilder;
$hosts = ['192.168.0.102'];
$client = ClientBuilder::create()->setHosts($hosts)->build();
$params = [
'index' => 'mynews', //index的名字不能是大写和下划线开头
'body' => [
"mappings" => [
"person" => [
"properties" => [
"title" => [
"type" => "text",
"analyzer" => "ik_max_word",
"search_analyzer" => "ik_max_word"
],
"content" => [
"type" => "text",
"analyzer" => "ik_max_word",
"search_analyzer" => "ik_max_word"
]
]
]
]
]
];
$respose = $client->index($params);
echo "<pre>";
print_r($respose);
|
插入数据insert.php
1
2
3
4
5
6
7
8
9
10
11
12
13
14
15
16
17
18
19
20
21
| <?php
require 'vendor/autoload.php';
use Elasticsearch\ClientBuilder;
$hosts = ['192.168.0.102'];
$client = ClientBuilder::create()->setHosts($hosts)->build();
$params = [
'index' => 'mynews',
'id' => 1,
'body' => [
'title' => 'Twitter主页改版 推普通用户消息增加趋势话题',
'content' => 'Twitter主页改版 推普通用户消息增加趋势话题'
]
];
$respose = $client->index($params);
echo "<pre>";
print_r($respose);
|
查询search.php
1
2
3
4
5
6
7
8
9
10
11
12
13
14
15
16
17
18
19
20
21
22
23
24
| <?php
require 'vendor/autoload.php';
use Elasticsearch\ClientBuilder;
$hosts = ['192.168.0.102'];
$client = ClientBuilder::create()->setHosts($hosts)->build();
$params = [
'index' => 'mynews',
'_source' => ['title','content'], // 请求指定的字段
'body' => [
'query' => [
'match' => [
'title' => '百度' // OR查询:空格隔开查询 (百度 普通)
]
]
]
];
$respose = $client->search($params);
echo "<pre>";
print_r($respose);
|